TSOT sketch challenge #96

Hi again everyone!

Hope you are staying warm wherever you are. I think all of the USA is in the grips of old man winter.  It is definitely good weather to stay inside and create and I’ve done just that.  Today I am entering a card in the Try Stampin’ on Tuesday sketch challenge.   Here is the sketch we are to use.

TST Sketch #93

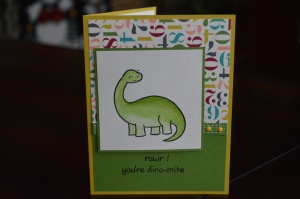
Our youngest grandchild turns 4 next week so I used this sketch to make his card.  He loves dinosaurs and he can name them all!  Such a smart kid!

Dinosaur card for Aiden       Inside of card

Supplies you will need: 

  • Cardstock:  Very Vanilla, Gumball Green, Summer Starfruit
  • DSP:  Birthday Basics (retired Stampin’ Up)
  • Watercolor paper
  • Stamps:   Lawn Fawn “Critters from the Past”, Hero Arts “Happy Birthday”
  • Ink:  Black Staz-on, Gumball Green
  • Aqua painter
  • Gumball Green ribbon
  • Candy dots (don’t know brand)
  • Adhesives:  tape runner, Scrappy Tape 1/4″
  • Dimensionals
  • Perfect Layers tool

Assembling the card:

  1. Form a 5 1/2″ x 4 1/4″ card from the Summer Starfruit cardstock and set aside.
  2. Cut a piece of watercolor paper 3″ x 3″.
  3. Stamp image (dinosaur for this card) in black Staz-On ink
  4. Use Gumball Green ink and the Aqua painter to color the dinosaur.  Set aside to dry.
  5. Cut a piece of Gumball Green cardstock to 3″ x 4″ and a piece of the DSP  3 1/4″ x 4″
  6. Adhere the DSP to the Gumball Green piece (NOTE:  I overlapped them about an inch but when they are together, it will measure 5 1/4″ x 4″ same as a standard mat for a card)
  7. Wrap ribbon around seam and secure to the back of this panel. Adhere panel to the front of the card.
  8. Take the watercolor piece with the dinosaur on it and adhere (I used the Scrappy Tape here) to a scrap of Gumball Green and using the Perfect Layers tool, make a 1/16″ border around this piece or cut a piece of Gumball Green cardstock 3 1/8″ x 3 1/8″ and center watercolor paper with the image on it to this piece of cardstock.
  9. Adhere to front of card  as shown using dimensionals.
  10. Stamp sentiments from the Lawn Fawn stamp set (rawr! your’re dino-mite) on the front of the card.
  11. Embellish with candy dots as shown
  12. Cut a piece of Very Vanilla cardstock 5 1/4″ x 4″ and stamp “Happy Birthday”  in Gumball Green.  Adhere to inside of card.

There you have it,  a CAS (clean and simple) birthday card.  This sketch could also work for many different occasions, so it is very versatile.

Until next time,

Happy Stamping!

Kathy


Masculine Card #3

Hello!

I hope you have been inspired this week with the masculine cards I have shared so far.  The Lovely as a Tree and Walk in the Wild stamp sets are such great sets for masculine cards and I use them a lot. Today I am sharing a card using the Harvest Blessings stamp set.

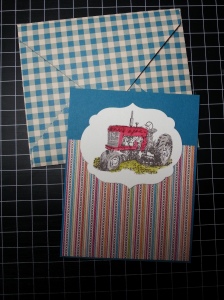
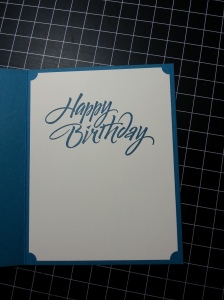
2014-03-19 10.00.40       2014-03-19 12.21.39

Items you will need: 

  • Cardstock:  Island Indigo, Very Vanilla (for inside card), Water color paper
  • DSP:   Orchard Harvest
  • Labels Collection Framelits
  • Cuttlebug or Big Shot, etc.
  • Stamps:  Harvest Blessings
  • Ink:  Island Indigo (inside card for sentiment), Staz-On (Timber Brown)
  • Stampin’ Write Markers:  Lucky Limeade, Real Red, Crumb Cake
  • Adhesive
  • Ticket punch
  • Envelope punch board

Assembling the card:

  1. Form a 4 1/4″ x 5 1/2″ card from the Island Indigo cardstock
  2. Adhere  4 1/8″ x 3 3/4″ piece of DSP to the card front as shown.
  3. Stamp the tractor from the Harvest Blessings stamp set onto watercolor paper and color in using Stampin’ Write markers
  4. Cut out using a Labels Collection framelit.
  5. Attach to front of card as shown.
  6. On the inside of the card I cut a piece of Very Vanilla 4″ x 5 1/4″, stamped my sentiment, punched the corners with the ticket punch, and then attached inside.  The Happy Birthday stamp is one that I got at Hobby Lobby at some point.
  7. For this card, I decided to make a matching envelope and I did this using the envelope punch board by We R Memory Keepers.  Here is a video on  it with instructions on how to use the board.  This board is great if you make non-traditional sized cards but also it has the measurements you need for making envelopes to fit the more traditional sizes of cards that we make most often.  The envelope punch board can make 60 different sizes of envelopes from a very small gift card holder up to an envelope that will hold a 6″ x 8 1/2″ card! Here is the link to the video (you may have to copy and paste it in your browser to get to it).   https://www.youtube.com/watch?v=akeOz0m8ByU

Thanks for stopping by today.   Happy Crafting!

Kathy

Masculine card #1

Hello again!  I hope you are having a great day!

This week I am going to focus on masculine cards.  Masculine cards pose a challenge for us all, I think, because we can’t use the bling and shiny ribbons and brads and glitter that we love to use on our girly cards yet we still want to create and send a card that shows that we care and that we took time to make the card.

So my first card I CASEd from France Martin of frenchiestamps.com.  It uses the Hardwood and Walk in the Wild stamp sets.  I absolutely LOVE the new Hardwood stamp. It is a great background stamp and works perfectly for masculine cards.

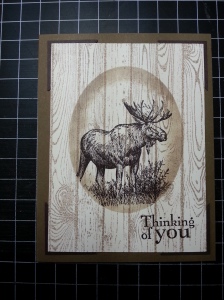
So let’s get to the card.  Isn’t this just an awesome masculine card?

2014-03-15 11.40.59

Items you will need: 

  • Cardstock:  Very Vanilla, Soft Suede, Early Espresso
  • Ink:   Crumb Cake, Early Espresso
  • Stamps:   Hardwood, Walk in the Wild
  • Punch:  1 1/4″ square punch
  • Computer paper (or other scrap paper), 1 piece
  • Oval framelits or Making Memories cutting system oval
  • Sponge daubers
  • Adhesives

Assembling the card:

  1. Form the card base using Soft Suede measuring 4 1/4″ x 5 1/2″.
  2. Cut  2 pieces of Very Vanilla 3 3/4″ x 5″.  (One of these is for the inside of the card)
  3. Using the 1 1/4″ square punch, punch two squares and cut in half diagonally with Early Espresso cardstock.
  4. Stamp the Hardwood image on one of the Very Vanilla pieces.  The easiest way to use these large stamps is to lay the stamp on the table stamp side up and ink it with your ink pad (Crumb Cake in this instance) then place your cardstock onto the stamp.  Lay the piece of computer paper over top and rub with your hand to get the image to transfer to the cardstock.  This ensures that you get even coverage of the image onto your cardstock.
  5. With the same piece of scrap paper cut an oval from the paper, one that is large enough that the Moose from the Walk in the Wild stamp set will fit into it. Use this as a template and center it on the piece of Very Vanilla that you just stamped with the Hardwood stamp.  With Early Espresso, stamp the Moose inside the oval.
  6. Without moving the template use the sponge dauber and sponge around the oval with the Crumb Cake ink.  Remove the template.  Stamp sentiment in bottom right corner.
  7. Next you will adhere the diagonal pieces from step 3 to each corner of the Very Vanilla card front as shown.
  8. Attach all this to the front of the card.
  9. Stamp a sentiment on the other piece of Very Vanilla cardstock from step 2 and adhere to inside of card (or it can be left blank for you to write on later)

So there you have it. An awesome masculine card for a birthday, father’s day, and I think even a get well card.  Thanks for stopping by and I hope you get a chance to create today.  Until next time, happy stamping!

Kathy

Dynamic Duos color challenge

Hello everyone!

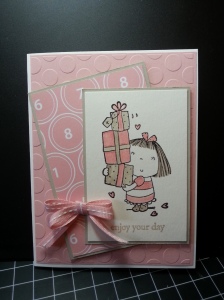
This week’s Dynamic Duos color challenge features Blushing Bride and Sahara Sand.  These colors made me think of a sweet little girl and so I used my Penny Black “T for Transparent” stamp set featuring Betsy Bluebell.   She is such a cute little girl and perfect for these colors.

Enjoy your day

This is the card I am submitting for the challenge.

2014-03-10 11.48.09


Supplies you will need: 

  • Cardstock:  Whisper White, Blushing Bride, Sahara Sand
  • DSP:  Just Add Cake
  • Penny Black Stamp set (or your favorite stamp set.  Greeting Card Kids would work with this card as well)
  • Embossing machine
  • GooseBumpz Spotted embossing folder.
  • 1/4″ stitched grosgrain ribbon from Stampin’ Up  – Blushing Bride
  • Adhesive, glue dots, and dimensionals
  • Ink:  Sahara Sand, Black Staz-On,  Blushing Bride stampin’ write marker
  • Blender pens
  • Perfect Layers tool for matting.
  • Water color paper

Assembling the card:

  1. Cut a piece of water color paper 2 1/2″ x 3 3/4″ and stamp image on that in black Staz-On ink. Color as shown.  I used my blender pen for the Sahara Sand ink.  Before opening the ink pad, squeeze it so that some of the ink is transferred to the inside of the lid.  Use this ink with your blender pen to color your image.  Next I colored with my Blushing Bride Stampin’ Write marker the areas as shown. Stamp sentiment under image
    Set aside for a few minutes to let the image dry.
  2. Cut Whisper White cardstock to form a 4 1/4″ x 5 1/2″ card
  3. Cut Blushing Bride cardstock 4 1/8″ x 5 3/8″ and run through your embossing machine using the large dotted embossing folder. Adhere to card front.
  4. Cut a piece of the Just Add Cake DSP 2 7/8″ x 4 1/4″.  Mat with Sahara Sand cardstock using the Perfect Layers tool with a 1/16″ border.  Also mat the image piece with a 1/16″ border on Sahara Sand
  5. Adhere image piece to the DSP as shown.  Attach to card using dimensionals.
  6. Make a bow ( I did a double one here) and attach to card front using glue dots.

And there you have it!  A cute little girl birthday card.  I hope you have time to create today!

Kathy

Simply Sketched Happy Birthday Wishes

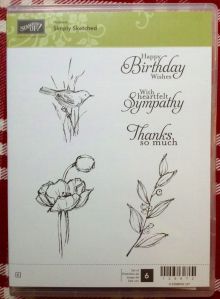
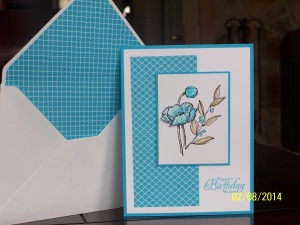
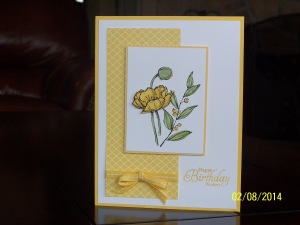
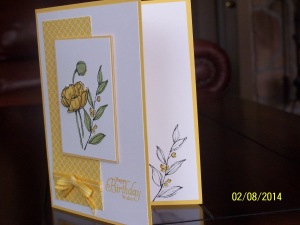
Today’s card is a birthday card that I CASE’d but now cannot find the link to the card I CASE’d.  It uses the Hostess Stamp Set Simply Sketched, which I am falling in love with.  The sentiments in this set are Happy Birthday Wishes, Thanks so much, and With heartfelt Sympathy.  Along with the sentiments are 3 images that I just love.  Here is a picture of the stamp set as well as the cards I made with it.

Picture of stamp set   100_8796  100_8794  100_8795

Items you will need: 

  • Simply Sketched stamp set
  • Ink:   Black Staz-on,  Tempting Turquoise or  Daffodil Delight
  • Stampin up Markers:  Tempting Turquoise and Crumb Cake or Daffodil Delight and Pear Pizzazz depending on which color scheme you use.
  • Ribbon:  Daffodil Delight
  • Cardstock:   Whisper White, Daffodil Delight, Tempting Turquoise
  • DSP:   Designer Series Paper Pack (Brights)
  • Envelope Punch Board by Making Memories

Assembling the card: 

  1. Cut card base:  6.5″ x 10″ to form a 6.5″ x 5″ card (I’m starting to like this larger size card!)
  2. Cut two pieces of Whisper White at 6.25″ x 4.75″.  One of these will be used on the inside of the card, the other for the front.
  3. Cut DSP 2.5″ x 5.75″
  4. Cut another piece of Whisper White 2 5/8″ x 3.5″ for your image.  Mat this with perfect layers tool using the 1/8″ border.
  5. Stamp images on the Whisper White in black Staz-On ink.  On a scrap of white cardstock, stamp another flower.
  6. Color in the images as shown using the markers.   Cut out the second flower image and place on top of other flower using dimensionals.
  7. Stamp sentiment in the lower right corner of the white cardstock and adhere to card front
  8. If you are going to use the ribbon, tie it around the DSP and adhere DSP to front of card as shown.
  9. Using dimensionals, adhere the smaller panel with the flower image on to the front of the card.
  10. Using the envelope punch board you can make a matching envelope for sending the card.
  11. Stamp leaves on lower right corner of inside card panel, color in the berries, and then adhere to card.

You could use any one of the sentiments in this set with this layout for a beautiful card for any occasion.  Enjoy your day!  Happy Stamping!

Kathy
Masculine Birthday Card

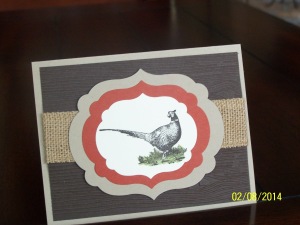
My father’s 88th birthday is coming up this weekend so I made him this card.  When we were growing up, Dad loved to go hunting deer, duck, goose, pheasant, squirrels, etc., so I thought it only appropriate to use the pheasant from the Walk in the Wild stamp set for his birthday card.  I CASE’d my card from Pam Steckham at http://stampininthesun77.blogspot.com/2013/09/stampin-ups-walk-in-wild-for-happy.html

Birthday card

Birthday card

Supplies:

  • Cardstock:  Crumb Cake, Early Espresso, Cajun Craze, Very Vanilla
  • Burlap ribbon
  • Wood Grain embossing folder
  • Labels collection framelits
  • die cutting machine (i.e. Cuttlebug, Big Shot, etc.)
  • Ink:  Early Espresso, Pear Pizzazz marker
  • Adhesive, dimensionals, Sticky tape

Assembling the card:

  1. Cut a piece of Crumb Cake cardstock 5 1/2″ x 8 1/2″ and fold to form a 5 1/2″ x 4 1/4″ card.
  2. Cut a piece of Early Espresso cardstock 4″ x 5 1/4″ and run through the Cuttlebug using the Woodgrain folder
  3. Next I cut a piece of burlap ribbon about 7 1/2″ and put 1/4″ sticky tape along the long edges of the ribbon.  Adhere to card front.
  4. Adhere this to the card base.
  5. Using the Labels collection framelits (I used the 2nd, 3rd, and 4th framelits in the set), cut largest one from Crumb Cake, then cut the next smallest from Cajun Craze.
  6. Stamp image on Very Vanilla cardstock and cut out using the smallest of the three framelits chosen for this project.
  7. Using the Pear Pizzazz marker, color in the grass.
  8. Adhere the layers together then using dimensionals, adhere to the front of the card.
  9. On the inside of the card  I used a 5 1/4″ x 4″ piece of Very Vanilla cardstock for my greeting.

This is a quick and easy masculine card to make!  Thanks for stopping by!

Kathy

Happy Birthday Wishes

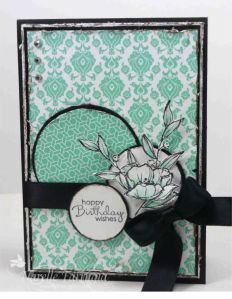
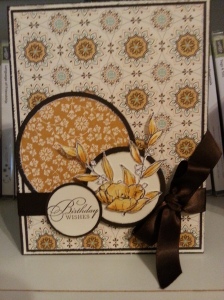
Hello again everyone.  Here is a birthday card I CASEd from Narelle Farrugia, a Stampin’ Up demonstrator from Melbourne AUS.  Here is her card first and then my card.

Narelle Farrugia's card

Narelle Farrugia’s card

My card

My card

Supplies you will need: 

  • Cardstock:  for this card I used Early Espresso, Very Vanilla, Water color paper
  • Ink:  Early Espresso, Timber Brown Stay-Zon ink, More Mustard
  • DSP is Spice Cake
  • Stamp sets:  Simply Sketched, Water color trio (You can also use the birthday sentiment from the Perfect Pairs stamp set which is what I think Narelle used)
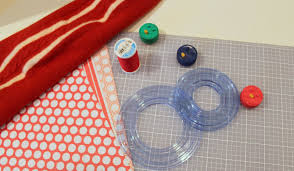
  • Making Memories Circle cutter.  (See image under Preparing the elements of the card to see what product I am using here).
  • Distress tool
  • 5/8″ ribbon (Early Espresso for my card)
  • Water color brush
  • Adhesive, glue dots, dimensionals
  • Brads or candy dots

Preparing the elements of the card: 

Card and card layers:

  • Card base:  6.5″ x 10″ folded in half to form a 6.5″ x 5″ side fold card
  • DSP layer 4.5″ x 6″
  • Next layer is 4 5/8″ x 6 1/8″ (**or you could use your Perfect Layers tool and create a 1/16″ border)
  • Next layer is 4.75″ x 6.25″ (again, you can use your Perfect Layers tool and create a 1/16″ border )

** If you use the Perfect Layers tool, roughen your edges  of each layer before you adhere them together.

Circles: Making Memories Circl Cutter image

  • Large circles:    I used the Making Memories Circles and blades to make these.  I used the largest Circle and cut one using the green blade in Early Espresso and the blue blade for the DSP.  These circles measure app 3 1/8″ and 3″
  • Medium Circles:   Use the medium circle from Making Memories Circles I cut the larger one with the green blade in Early Espresso and the blue blade for the Very Vanilla. These measure app 2 1/8″ and 2″
  • Small Circles:  I actually used my circle punches for these two using the 1 1/2″ circle punch for the  Early Espresso. I stamped my sentiment on Very Vanilla and then punched out with the 1 3/8″ punch.
  • Using the distress tool roughen the edges of the smaller circles in each of these pairs of circles then adhere them to the larger circle in the pair.  Set aside.

Flower and leaves:

  • Stamp the flower and two of the leaves stamps from Simply Sketched onto water color paper using Timber Brown Sta-Zon ink.
  • Water color using More Mustard ink and your water color brush.
  • Cut them out and set aside.  I used scissors and an X-acto  knife for cutting the more intricate parts of the leaves/berries.

Assembling the card:

  1. Rough up the edges of your layers (if you haven’t done so already) and layer them together.
  2. Adhere largest circle to the card as shown.
  3. Tie ribbon around the layers and tie a bow as shown. Attach brads (or candy dots) in the upper left corner of the card as shown (see Narelle’s card as I forgot to do this. I will add Candy Dots later). At this point you can adhere this all to the card base.
  4. Next attach medium circles as shown.
  5. Adhere flower and leaves to the card as shown. I used adhesive (snail, etc.) on the part of the leaves that would be on the medium circle. Cut the leaves on the left to get them to fit.  The flower is attached with dimensionals.
  6. Adhere the smallest circle using adhesive on the side that attaches to the medium circle and dimensionals ( you may need to use two on top of each other) on the left side of the circle.
  7. Decorate the inside of the card as you wish.

This card did take awhile to make, but the end result is just stunning!  I hope that you can follow these directions as there is a lot of prep work.  Please feel free to send me a message if you have any questions.

Kathy

Birthday Wishes

Hello,

I know….. it’s been a long time.  Late July and August have been very busy and I just didn’t have a lot of time to post but I’m back and hope to be posting a little more regularly.  We’ll see how that goes!   One of the things I did was go on a 4-day scrapbooking retreat and I made 24 cards during that time.  So I have lots to share over the next few months.

To start things off, I want to wish a Happy 6th Birthday today to my grandson, Landon.  He is such a great kid and has the best sense of humor.  He keeps us all laughing with his antics.

Landon holding up 6 fingers

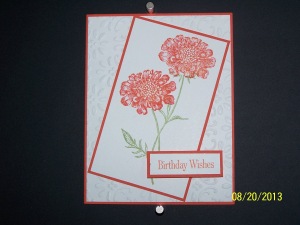
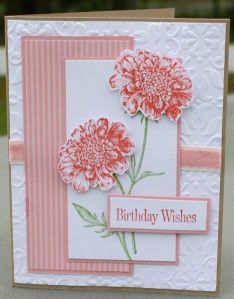
Now onto my card.  I CASEd (copied and shared with everyone) this card from JoAnn at http://www.craftynanasblog.blogspot.com.  Isn’t it beautiful?  I just love the Field Flowers stamp set.

JoAnn's card

JoAnn’s card

My rendition of her card

My rendition of her card

Items you will need:

  • Card stock (CS):  Tangerine Tango, Whisper White
  • Stamps:   Occasional Quotes, Field Flowers (see more info on this stamp set at end of post)
  • Inks:    Tangerine Tango, Poppy Parade, Pear Pizzazz
  • Embossing folder (EF):   Finial Press
  • Stampin’ dimensionals (or other pop dots)
  • Perfect layers tool
  • Stamp-a-ma-jig

Assembling the card:

  1. Cut a piece of Tangerine Tango CS  8 1/2″ x 11″ in half on the long side so form a card 4 1/2″ x 5 1/2″
  2. Cut a piece of Whisper White CS 5 7/8″ x 4 1/8″ and emboss using the Finial Press EF
  3. Adhere to front of card as shown.
  4. Stamp the stem of the Field Flowers stamp in Pear Pizzazz on Whisper White CS.  Using your Stamp-a-ma-jig stamp your flowers on the stems as shown.  First stamp with Tangerine Tango and then again with Poppy Parade (see below).
  5. Adhere to a piece of Tangerine Tango and using your Perfect Layers tool, make a 1/16″  border all around.   Adhere to card as shown.
  6. Stamp “Birthday Wishes” in Tangerine Tango onto a scrap of Whisper White paper and cut to 2″ x 5/8″.  Layer again with Tangerine Tango CS with a border of 1/16″.
  7. Adhere to front of card using dimensionals (or pop dots).

This is a quick and easy card to make but oh so pretty.  Now more about the Field Flowers stamp set.

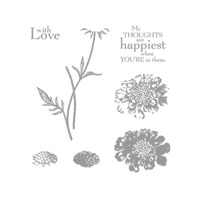
Field flowers stamp set

These are the stamps that come in the set. You have a more solid image that you would stamp with a light color (Tangerine Tango in this case) and then the outline stamp that you stamp in a darker coordinating color (Poppy Parade in this case).  This gives more dimension to the flowers.  You can also add the flower center as well but I did not do that with this card. You would stamp the same way (the more solid center in the lighter color and the outline stamp in the darker color.)

I hope you give this card a try.   Have a great day and until we meet again, happy stamping!   If you would like to follow my blog click on “Follow” in the bottom right corner of your computer screen (it is not part of the post but waaaay over to the lower right portion of your screen.)  For all of you who are already following my blog, I thank you for allowing me to hopefully inspire your creativity while making cards.  Have a great day!

Kathy