TSOT sketch challenge #96

Hi again everyone!

Hope you are staying warm wherever you are. I think all of the USA is in the grips of old man winter.  It is definitely good weather to stay inside and create and I’ve done just that.  Today I am entering a card in the Try Stampin’ on Tuesday sketch challenge.   Here is the sketch we are to use.

TST Sketch #93

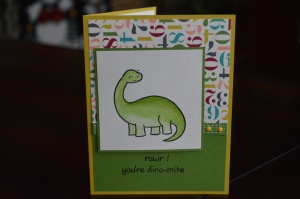
Our youngest grandchild turns 4 next week so I used this sketch to make his card.  He loves dinosaurs and he can name them all!  Such a smart kid!

Dinosaur card for Aiden       Inside of card

Supplies you will need: 

  • Cardstock:  Very Vanilla, Gumball Green, Summer Starfruit
  • DSP:  Birthday Basics (retired Stampin’ Up)
  • Watercolor paper
  • Stamps:   Lawn Fawn “Critters from the Past”, Hero Arts “Happy Birthday”
  • Ink:  Black Staz-on, Gumball Green
  • Aqua painter
  • Gumball Green ribbon
  • Candy dots (don’t know brand)
  • Adhesives:  tape runner, Scrappy Tape 1/4″
  • Dimensionals
  • Perfect Layers tool

Assembling the card:

  1. Form a 5 1/2″ x 4 1/4″ card from the Summer Starfruit cardstock and set aside.
  2. Cut a piece of watercolor paper 3″ x 3″.
  3. Stamp image (dinosaur for this card) in black Staz-On ink
  4. Use Gumball Green ink and the Aqua painter to color the dinosaur.  Set aside to dry.
  5. Cut a piece of Gumball Green cardstock to 3″ x 4″ and a piece of the DSP  3 1/4″ x 4″
  6. Adhere the DSP to the Gumball Green piece (NOTE:  I overlapped them about an inch but when they are together, it will measure 5 1/4″ x 4″ same as a standard mat for a card)
  7. Wrap ribbon around seam and secure to the back of this panel. Adhere panel to the front of the card.
  8. Take the watercolor piece with the dinosaur on it and adhere (I used the Scrappy Tape here) to a scrap of Gumball Green and using the Perfect Layers tool, make a 1/16″ border around this piece or cut a piece of Gumball Green cardstock 3 1/8″ x 3 1/8″ and center watercolor paper with the image on it to this piece of cardstock.
  9. Adhere to front of card  as shown using dimensionals.
  10. Stamp sentiments from the Lawn Fawn stamp set (rawr! your’re dino-mite) on the front of the card.
  11. Embellish with candy dots as shown
  12. Cut a piece of Very Vanilla cardstock 5 1/4″ x 4″ and stamp “Happy Birthday”  in Gumball Green.  Adhere to inside of card.

There you have it,  a CAS (clean and simple) birthday card.  This sketch could also work for many different occasions, so it is very versatile.

Until next time,

Happy Stamping!

Kathy


Sympathy card

Hello everyone,

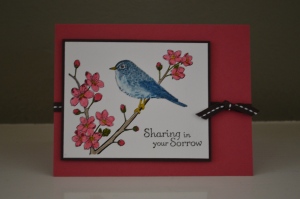
My aunt died recently and so I needed to make some sympathy cards for her family  so the next couple of posts will be about those cards. My aunt was a great lady and she will be sorely missed.  Here is one of the cards I made.

DSC_0327

Supplies you will need: 

  • Cardstock:  Primrose Petals, Early Espresso, Whisper White
  • Watercolor paper
  • Stamps:  Cherry Blossom Bird (Stampabilities), Thoughts and Prayers (Stampin’ Up)
  • Ink:  Staz-On black, Early Espresso
  • Stampin’ Write markers:  Primrose Petals, Regal Rose, Crumb Cake, Early Espresso, Old Olive, Marina Mist, and Daffodil Delight
  • Blender Pen
  • Early Espresso ribbon
  • Perfect Layers tool
  • Adhesive, glue dots,  and dimensionals

Assembling the card:

  1. Form a 5 1/2″ x 4 1/4″ card from the Primrose Petals card stock. Set aside.
  2. Stamp image onto watercolor paper with the Staz-On ink and color.  On the bird’s breast I just did dots of the Marina Mist and then blended them out with the blender pen to give it the lighter hue.
  3. Stamp sentiment onto the image piece
  4. Trim around your image (on this card it measures 4″ x 3 1/4″)
  5. Using the Perfect Layers tool, create a 1/16″ border around the watercolor paper with Early Espresso CS. (or cut to 4 1/8″ x  3 3/8″)
  6. Tie ribbon around card front.  Make a knot to the right side of the card.  I used small glue dots to anchor the knot as well as the ribbon on the inside top of the card.
  7. Adhere image with dimensionals.
  8. Cut a piece of Whisper White CS 4″ x 5 1/4″.   I stamped a small portion of the flowers in the lower right corner of this piece and colored the same as the front. Next I stamped my sentiment.
  9. Adhere to inside of card.

This CAS (clean and simple) card is just right for a sympathy card but can also be used for any occasion by changing out the stamps and the image.  Until next time, happy stamping!

Kathy

Dynamic Duos #100

Hi everyone.  I’m back again with another Dynamic Duos color challenge.  Dynamic Duos also announced today that this was going to be their last challenge as they are closing the Dynamic Duos blog!  I’m crushed.  Even though I haven’t participated in all their challenges, I did enjoy the challenge of putting different colors together and playing around to create a card for submission.  With that in mind, I thought it was appropriate to make a Thank You card for the ladies at Dynamic Duos for challenging me to create cards with colors that I may not have necessarily put together.

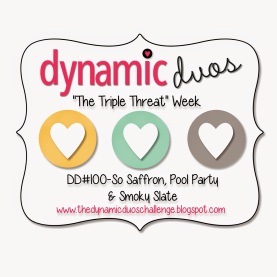
Today’s challenge is The Triple Threat and the colors are So Saffron, Pool Party, and Smoky Slate.

Dynamic Duos Redo 2013-007

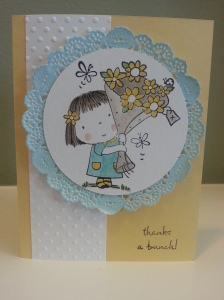
And here is the card idea I came up with:

CAS Thank You

CAS Thank You

Supplies you will need:  

  • Cardstock:  So Saffron, Whisper White, Watercolor paper.
  • Inks:  Black Staz-On, VersaMark,  Sahara Sand, Basic Black
  • Stampin’ Write markers:   Pool Party, So Saffron, Pear Pizzazz, Crumb Cake, Blush Blossom
  • Water color brush (Sahara Sand)
  • 4″  Paper Doily
  • Pool Party Embossing powder
  • Heat gun for embossing
  • Polka Dot embossing folder
  • Stamps:   Penny Black “T for Transparent” stamp set.
  • Adhesive and dimensionals
  • Making Memories circle cutter

Assembling the card: 

  1. Using watercolor paper stamp image in black Staz-On ink.
  2. Color in:  I used the markers for everything but the “paper wrap” that the bouquet of flowers is in.  I used the water color brush for that with Sahara Sand ink.  Let dry.
  3. Get your paper doily and a piece of scrap paper (I used computer paper).  Lay the doily on the scrap paper and ink up half of the doily.  Sprinkle with Pool Party embossing powder and tap off excess.  Heat emboss with heat gun.  Ink up the other half of the paper doily with the VersaMark, sprinkle with Pool Party embossing powder and heat set with the heat gun.  (My doily curled up a lot this time so I placed it under some weights for a little while to flatten it back out.)
  4. Using my Making Memories circle cutter, I cut out the image (it measures approximately 3 1/4″  in diameter) and then adhered to the Paper Doily.
  5. Form card base from So Saffron to measure 4 1/4″ x 5 1/2″.
  6. Take a piece of Whisper White cardstock that measures 5 1/2″ x 1 3/4″ and run through the polka dot embossing folder.  Adhere to front of card as shown.
  7. Using dimensionals adhere paper doily to front of card as shown.
  8. Stamp sentiment in lower right corner.

I just love little Betsy Bluebell and I think she was the perfect choice for today’s card.  And again, a big thanks to the ladies at Dynamic Duos for challenging me to be more creative!

Thanks for stopping by.  Have a great day and happy stamping!

Kathy